 Pin it
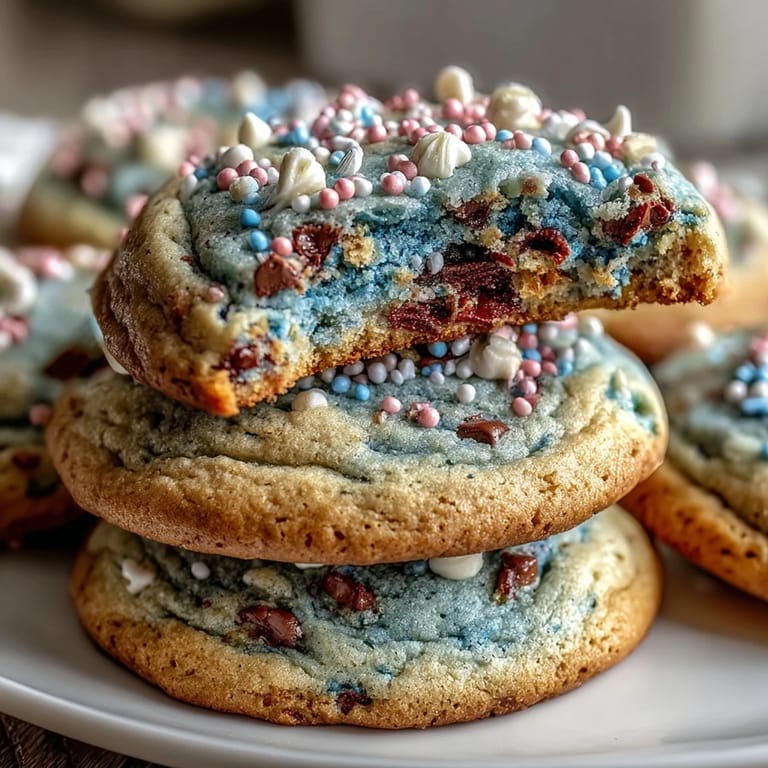
 My niece turned seven last month, and she'd been obsessed with Cookie Run Kingdom for weeks, sketching little cookie characters in her notebook and describing their magical powers in elaborate detail. When she asked if I could make her birthday cookies look like they came straight from the game, I immediately thought of pastels and swirls—soft, whimsical, and honestly more forgiving than I expected. The first batch turned into this gorgeous twisted marble effect that made her gasp when she walked into the kitchen, and I realized these weren't just cookies anymore, they were tiny edible works of art that tasted as good as they looked.
Watching my sister frost a dozen store-bought cookies for my niece's last birthday party made me think there had to be something better, something that didn't taste like cardboard no matter how pretty the icing was. These cookies changed that—they're soft enough to melt in your mouth while holding their shape beautifully, and the pastel colors don't require food coloring accidents or complicated layering. My niece's friends kept asking for the recipe, and that's when I knew I'd created something special.
Ingredients
- All-purpose flour: Two and a half cups gives you structure without being heavy; I learned to measure by weight (320g) rather than scooping directly into the bag, which can pack the flour and make cookies dense.
- Unsalted butter: Room temperature is non-negotiable here because cold butter won't cream properly with the sugar, and you'll miss that light, fluffy texture that makes these cookies so tender.
- Granulated sugar: One cup of standard sugar keeps things simple; some bakers swear by using half brown sugar for depth, but these cookies shine with pure sweetness.
- Baking powder: A light hand with leavening (just half a teaspoon) prevents the cookies from puffing up too much and losing that delicate, slightly chewy center.
- Gel food coloring: This is the secret to vibrant pastels without thinning your dough like liquid coloring would; I discovered that a tiny dab goes much further than you'd think.
- Egg and vanilla extract: One large egg binds everything while two teaspoons of vanilla keeps the flavor clean and bright, letting the butter shine through.
Tired of Takeout? 🥡
Get 10 meals you can make faster than delivery arrives. Seriously.
One email. No spam. Unsubscribe anytime.
Instructions
- Combine the dry ingredients:
- Whisk together the flour, baking powder, and salt in a medium bowl, making sure the baking powder is evenly distributed so you don't get pockets of rising dough. Set this aside and resist the urge to sift unless you really want to—whisking does the job just fine.
- Cream butter and sugar:
- In your large mixing bowl, beat the softened butter and sugar together for about two to three minutes until the mixture looks pale and fluffy, which means air is being incorporated. You'll know it's ready when you can drag your finger through it and the line holds for a moment.
- Mix in the wet ingredients:
- Add the egg, vanilla, and almond extract (if using) to the creamed butter and sugar, beating until everything is well combined and the mixture looks slightly lighter. Scrape down the sides of the bowl a couple of times to make sure nothing gets left behind.
- Combine wet and dry:
- Add the flour mixture to the wet ingredients gradually, mixing on low speed just until you don't see any white streaks of flour anymore. Stop here—overworking the dough at this stage will make your cookies tough, and nobody wants that.
- Divide and color your dough:
- Split the dough into three or four equal portions (depending on how many colors you want), then add just a touch of gel food coloring to each one. Knead each portion gently with your hands until the color is evenly distributed and you have a smooth, pastel-tinted dough.
- Create the swirled ropes:
- Roll each colored portion into a rope about 12 inches long, then gently twist two or three ropes together in a loose spiral—think of braiding rather than wrapping tightly. If the log gets too long or unwieldy, slice it in half to make it easier to handle.
- Chill the dough:
- Wrap your swirled dough log(s) in plastic wrap and refrigerate for at least two hours until the dough is firm enough to slice cleanly without the colors bleeding together. I often make this the night before so it's ready to go in the morning.
- Preheat and prepare:
- Set your oven to 350°F (175°C) and line your baking sheets with parchment paper while the dough finishes chilling. This step takes two minutes but saves you from scrambling when you're ready to slice and bake.
- Slice and decorate:
- Remove the dough from the fridge and, using a sharp knife, slice the log into quarter-inch thick rounds, wiping the blade clean between cuts for neat edges. If you want sprinkles, add them now before baking so they stick to the slightly sticky dough surface.
- Bake until golden:
- Arrange the sliced cookies on your prepared baking sheets about two inches apart (they'll spread slightly but not a ton), then bake for ten to twelve minutes until the edges just start to turn golden. Pull them out when they still look slightly underbaked in the very center—they'll continue cooking on the hot sheet and stay wonderfully soft.
- Cool and transfer:
- Let the cookies cool on the baking sheet for five minutes so they set enough to move without falling apart, then transfer them to a wire rack for complete cooling. This waiting period is actually the hardest part because they smell absolutely incredible.
 Pin it
 There's something magical about pulling a tray of these cookies from the oven and watching the pastel swirls catch the light, each one slightly different from the last because that's the nature of hand-twisted dough. My niece displayed them on a tiered stand at her party like they were edible jewelry, and seeing her friends' faces light up when they realized these beautiful cookies tasted incredible was worth every minute of prep time.
The Secret to Soft Centers
The key to these cookies staying soft and tender rather than becoming crispy wafers is all about not overbaking and letting them finish cooking on the hot baking sheet after you pull them from the oven. I used to pull cookies out when they looked perfectly golden, but I learned that pulling them a minute early and letting the residual heat do the final cooking gives you that ideal texture where the edges have just a tiny bit of crisp but the center stays pillowy. It sounds counterintuitive, but it works every single time.
Making the Swirls Picture-Perfect
The twisted rope technique is simpler than it looks, and the beauty comes from not overthinking it—loose, organic-looking twists are actually more visually interesting than tight, uniform braids. I discovered this by accident on my second batch when I was too lazy to be precise and ended up with these gorgeous, natural-looking swirls that my niece loved more than my perfectly symmetrical first attempt. The key is gentle handling so the colors stay defined rather than muddying together, and if you're worried about messing up, remember that every cookie looks slightly different, which is part of the charm.
Storage and Make-Ahead Magic
These cookies are incredibly forgiving when it comes to timing, which is perfect for anyone planning ahead for a party or celebration. You can make the dough and let it chill overnight or even for two days, and the cookies keep beautifully in an airtight container at room temperature for up to five days—they actually taste better on day two when the flavors have settled. If you want to get really ahead, you can freeze the unbaked dough log for up to two months, then slice and bake straight from frozen, adding just a minute or two to the baking time.
- Store in an airtight container to keep them soft and prevent them from picking up flavors from the fridge.
- Freeze the dough log in a resealable bag for up to two months if you want to have fresh cookies on demand.
- Let cookies cool completely before stacking or storing so they don't stick together or lose their shape.
 Pin it
 Making these cookies has become my go-to move for celebrations because they hit that rare sweet spot of being impressive enough to wow people visually while remaining approachable enough to make at home. Every time I bake them, I remember my niece's face when she saw them, and I know this is the recipe I'll be making for her birthday parties for years to come.
Recipe Questions & Answers
- → What causes the pastel swirl effect in the cookies?
Dividing the dough and tinting each portion with different pastel gel colors, then twisting them together, creates the characteristic swirled look.
- → Can I use other types of food coloring besides gel?
Gel food coloring is recommended as it provides vibrant colors without affecting dough consistency, unlike liquid colors which can make the dough too soft.
- → Why is chilling the dough necessary before baking?
Chilling firms up the dough, making it easier to slice and helping the cookies maintain their shape during baking.
- → How should the cookies be stored after baking?
Store in an airtight container at room temperature for up to 5 days to preserve freshness and softness.
- → Can I add flavors to customize these cookies?
Yes, adding citrus zest like lemon or orange can enhance flavor without disrupting the pastel swirl effect.