 Pin it
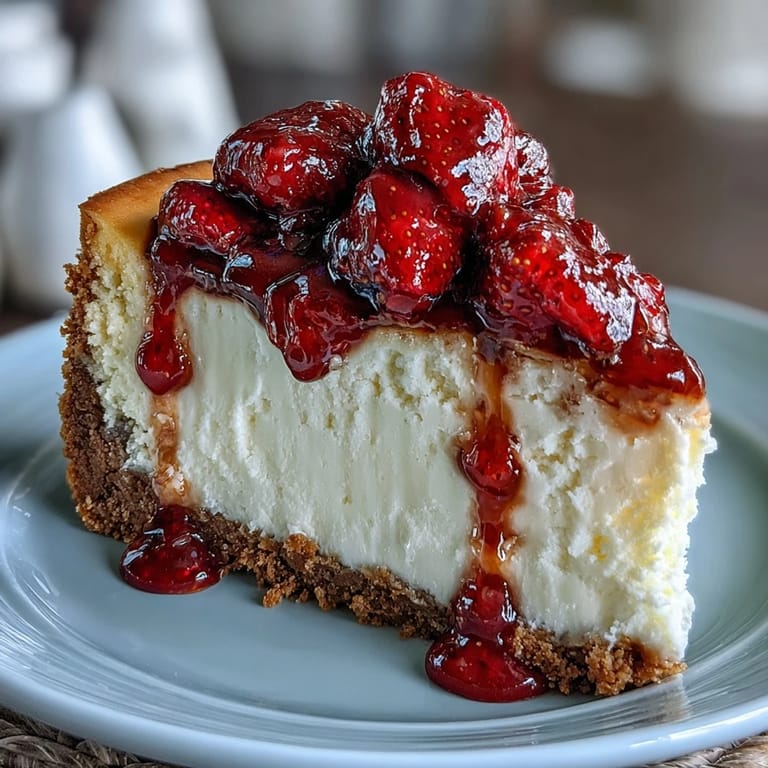
 My cousin texted me three weeks before her graduation asking if I could bring something special to the party, and I immediately thought of these cheesecake bites. There's something about making miniature versions of a classic dessert that feels like you're creating tiny celebrations in edible form. The first batch I made, I accidentally overfilled the liners and ended up with what looked like cheesecake volcanoes, but nobody complained when they tasted them. Since then, I've perfected the ratio, and these little bites have become my go-to for marking life's big moments.
I'll never forget watching my friend's daughter carefully remove the diploma pick from her cheesecake bite and keep it as a keepsake while her parents beamed nearby. That's when I realized these weren't just desserts anymore—they'd become little edible memories of a milestone. The kitchen was warm and chaotic that afternoon, with three of us frosting and decorating while someone's playlist shuffled in the background, and somehow it felt less like work and more like being part of something meaningful.
Ingredients
- Graham cracker crumbs: The foundation that makes every bite feel intentional—use fresh ones if you can because stale crackers turn to powder instead of texture.
- Granulated sugar: Keeps the crust crisp and the filling smooth; don't skip the creaming step or you'll taste grittiness.
- Unsalted butter, melted: The warm butter binds everything together and adds richness, so melt it fully before mixing.
- Cream cheese, softened: Room temperature is non-negotiable here; cold cream cheese creates lumps that no amount of beating can fix.
- Egg: Just one holds the filling together while keeping it light and custardy instead of dense.
- Vanilla extract: A teaspoon is all you need to elevate the flavor without overpowering the delicate tanginess of the cream cheese.
- Sour cream: This is the secret weapon that adds moisture and tang, preventing the bites from becoming dry.
- Fresh mixed berries: Choose berries that are ripe but still firm so they don't turn into mush; dice them small so they don't topple.
- Fruit preserves: Optional but worth it—brush a tiny amount over the berries for a glossy, jewel-like finish.
- Diploma picks: Search online for graduation-themed picks or make your own with cardstock rolled into scrolls and tied with twine.
Tired of Takeout? 🥡
Get 10 meals you can make faster than delivery arrives. Seriously.
One email. No spam. Unsubscribe anytime.
Instructions
- Prepare your stage:
- Preheat the oven to 325°F and line your mini muffin pan with liners—having everything ready before you start mixing prevents rushed moments and burnt batches. The lower temperature keeps the delicate cheesecake from cracking, which I learned the hard way on my first attempt.
- Build the crust:
- Mix the graham cracker crumbs, sugar, and melted butter until it looks like wet sand, then press exactly 1 teaspoon firmly into each liner. This gentle pressure creates a compact base that won't crumble when you bite into it.
- Pre-bake for stability:
- Bake these crusts for 5 minutes solo so they set slightly before the filling goes on top. This extra step prevents a soggy bottom, which is the difference between a bite that holds together and one that falls apart on the plate.
- Create the filling:
- Beat the softened cream cheese and sugar until completely smooth, which takes longer than you'd think but is worth every second. Add the egg, vanilla, and sour cream slowly and stop mixing the moment everything is combined—overbeating incorporates air that causes cracking.
- Fill with precision:
- Spoon about 1 tablespoon of filling onto each cooled crust and use a small offset spatula to smooth the tops level. Leave a tiny bit of space at the rim so the filling doesn't overflow when it bakes.
- Bake until almost-set:
- Watch them around the 13-minute mark—you want the edges set but the centers still slightly jiggly, like they're barely holding themselves together. That jiggle means they'll finish setting as they cool, staying creamy instead of becoming rubbery.
- Cool gradually:
- Let them sit in the pan for 15 minutes before moving them to a wire rack, allowing them to adjust to the temperature change without cracking. This slow cooling is what separates these from the cheesecake bites you've bought at bakeries.
- Chill completely:
- Give them at least an hour in the fridge, though overnight is even better—cold cheesecake has a completely different, more luxurious texture than room temperature.
- Top and celebrate:
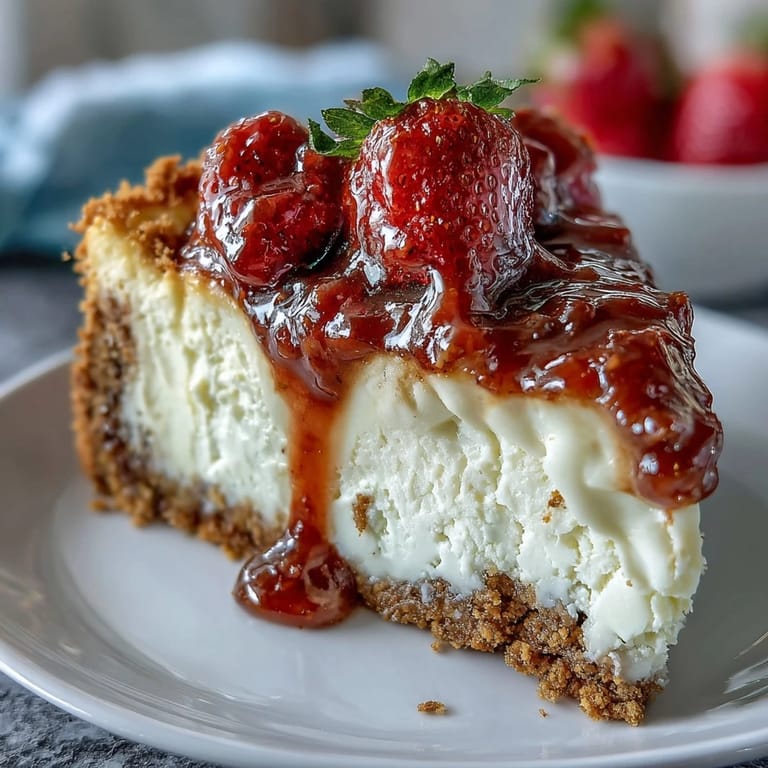
- Just before serving, add your berries and a tiny brush of warm preserves if using, then stick in a diploma pick for that ceremonial moment. These final touches are when they go from looking homemade to looking like they came from a fancy patisserie.
 Pin it
 There's a quiet confidence that comes from knowing you can pull together 24 individual desserts that look impressive but feel approachable. These cheesecake bites taught me that sometimes the most memorable treats are the ones you make at your own kitchen counter, not the ones you ordered from a fancy bakery.
Flavor Variations Worth Trying
Once you nail the basic version, the customization possibilities become endless and honestly kind of addictive. A friend suggested adding lemon zest to the filling one afternoon, and now that's my go-to for spring celebrations because it cuts through the richness beautifully. You could also swirl a tiny amount of melted chocolate into the filling before baking, or mix in a pinch of cinnamon for a fall twist—just remember that additions should be subtle since these are already perfectly balanced.
Make-Ahead and Storage Strategy
The smartest thing I ever did was bake these the day before an event, which takes the morning-of pressure completely off. You can bake them up to 3 days in advance and keep them in an airtight container in the fridge, though they're genuinely best eaten within 2 days when the crust still has a slight crunch. If you're feeling ambitious, you can even prepare the crust mixture the day before and store it in a sealed bag, then assemble and bake the morning of your event.
Graduation Party Presentation
The diploma picks elevate these from simple desserts to party statement pieces that guests actually want to photograph. I learned to insert the picks just before serving rather than earlier, because they can shift around if the cheesecake isn't fully chilled. You could also arrange them on a tiered stand to create height and visual interest, or place them on a long wooden board lined with parchment paper for a more casual, approachable vibe that still feels celebratory.
- DIY picks are surprisingly easy—just roll cardstock, secure with twine, and write a encouraging message or the graduate's initials.
- Arrange the bites on a platter in neat rows so guests can easily grab them without the whole display looking disheveled.
- Keep them refrigerated until the last possible moment so they stay pristine and don't start sweating under warm party lights.
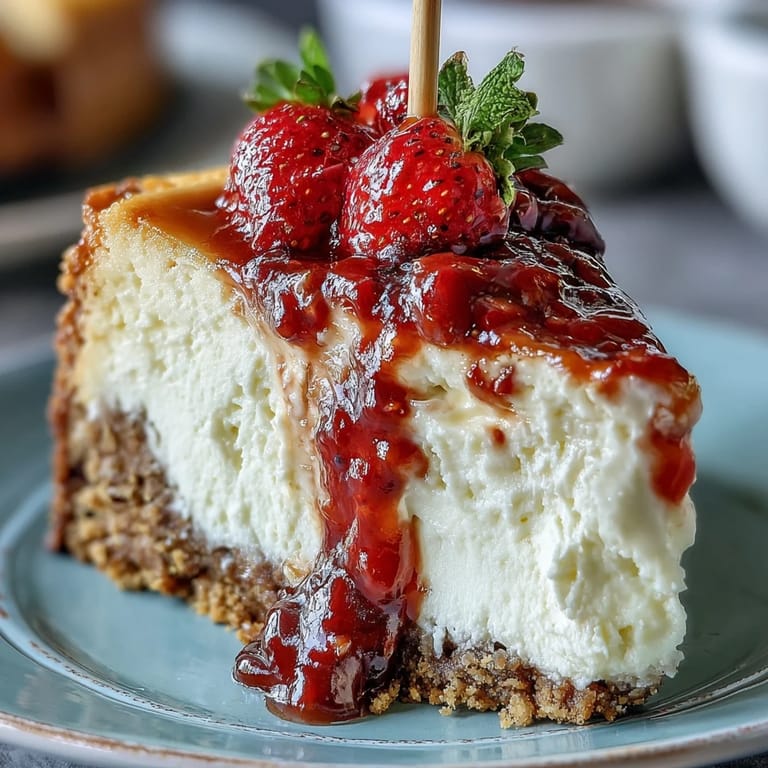
 Pin it
 These little cheesecake bites have become my way of saying I'm proud of you and I was here to celebrate in a format that's both delicious and deeply personal. Every time someone bites into one at a graduation, promotion, or special dinner, I'm reminded that food made by hand carries a different kind of love than something ordered.
Recipe Questions & Answers
- → What type of crust is used for these cheesecake bites?
A buttery graham cracker crust forms the base, combining graham cracker crumbs, sugar, and melted butter pressed into mini muffin liners.
- → How long should the bites be chilled before serving?
Chill the bites in the refrigerator for at least one hour to ensure they set properly and achieve the ideal creamy texture.
- → Can these cheesecake bites be customized with different toppings?
Yes, fresh mixed berries are classic, but you can add a light glaze of fruit preserves or try variations like lemon zest or chocolate swirls for extra flavor.
- → Are there gluten-free options available?
Gluten-free graham cracker crumbs can be used to make these bites suitable for gluten-sensitive diets without compromising taste.
- → What tools are needed to prepare these bites?
A mini muffin pan, electric mixer, mixing bowls, measuring tools, and a wire rack for cooling are required to make the process smooth and efficient.
- → How should leftover bites be stored?
Store in an airtight container in the refrigerator and consume within three days to maintain freshness and flavor.